Wanna do it simply? Here's the program to do it....resize your pictures in an instant by a right click....
both 32 bit and 64 bit stable versions HERE
Sunday, October 30, 2011
Wednesday, October 19, 2011
LASTPASS Mobile.....here's how to get it for free....check it out....
All right......get a USB stick....download and install Firefox Portable to it.....once up and running go ahead and install all the extensions you normally use including LASTPASS....unplug and take it with you wherever you go and you have a full fledged working Firefox browser with all your goods on it! Just plug into any computer...run the Firefox .exe and away you go....
get Firefox Portable HERE

get Firefox Portable HERE
Monday, October 17, 2011
Dual Monitors-how to get two different backgrounds working on them
Jon Tackabury has created a Free piece of software that lets you easily set separate wallpapers for each desktop. Once the software is installed, you’ll notice a new tray icon. Clicking the Desktop Wallpaper item from the menu will open up the dialog where you can set the wallpaper.
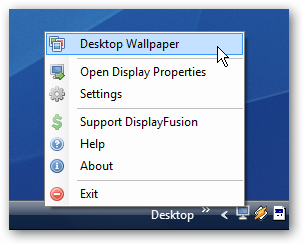
You can click on each desktop in the display, and set display settings differently for each monitor, or span the wallpaper across the two.

Or you can even load wallpaper from Flickr, which is an incredibly cool feature. Type in “vista wallpaper” for some really nice images.

If you chose the Settings from the tray icon popup menu, you’ll notice that this application also adds a set of shortcut keys that can be used to move windows from one monitor to the other.

Download DisplayFusion from Binaryfortress (Vista/XP/Win7)
You can click on each desktop in the display, and set display settings differently for each monitor, or span the wallpaper across the two.
Or you can even load wallpaper from Flickr, which is an incredibly cool feature. Type in “vista wallpaper” for some really nice images.
If you chose the Settings from the tray icon popup menu, you’ll notice that this application also adds a set of shortcut keys that can be used to move windows from one monitor to the other.
Download DisplayFusion from Binaryfortress (Vista/XP/Win7)
Dual Monitor issue-Firefox.....simple fix
If you use dual monitors make sure you close down Firefox in the monitor you want to use....whichever monitor you "drag" it in to view will be the one that will reopen Firefox....
Seems to be a problem for lots of folks....
Dual monitor usage can be a little bit weird till you get used to it......
Seems to be a problem for lots of folks....
Dual monitor usage can be a little bit weird till you get used to it......
Saturday, October 15, 2011
Change the Registered Owner of your PC....smart hack
Open up regedit.exe through the start menu search box, and then locate the following registry key:

Now you can find the RegisteredOwner and RegisteredOrganization keys in the right-hand pane. Change them to whatever values you want.
To show off the new changes, just type winver.exe into the start menu search box to see the About Windows box:
HKEY_LOCAL_MACHINE\SOFTWARE\Microsoft\Windows NT\CurrentVersion
Now you can find the RegisteredOwner and RegisteredOrganization keys in the right-hand pane. Change them to whatever values you want.
To show off the new changes, just type winver.exe into the start menu search box to see the About Windows box:
Friday, October 14, 2011
Windows 8 Dual Boot with Linux....simple way to do it....
Windows 8 -Linux dual boot(Wubi)
1. download and install win8
2. download and install easyBCD INSIDE win8
4. Download the Wubi.exe file inside win8, run
5. Install Ubuntu into folder on C drive
6. Open EasyBCD and make your newfound (x)ubuntu the "default OS"
7. Reboot, select (x)ubuntu
8. this will complete your linux install. reboot and choose win8
9. enjoy!
Tuesday, October 11, 2011
The Mystery_Where does Google Chrome install itself???
Where Does Google Chrome Install Itself?
In Windows XP Google Chrome will be installed in C:Documents and SettingsUserNameLocal SettingsApplication DataGoogleChrome directory. In Windows Vista Google Chrome will be installed in C:UsersUserNameAppDataLocalGoogleChrome directory.Replace C: with the drive windows is installed in and UserName with the windows users you installed chrome with. We are not sure why they install in the Local App Data folder, and they do not provide any way to change the settings, while you are installing the software. You can easily uninstall Google Chrome through the control panel.
Android on an SD Card- Corrupted due to issues
For those of you who own smartphones and have any tech knowledge, no doubt you have tried other good stuff with it..XDA DEVELOPERS is the place to get it. For those of you who use an SD card for the Android OS and have issues with it getting corrupted sometimes and failing to start here is the fix:
Save any files you want to off the SD....Format the card....then reinstall the SD Rom back onto the card...once you fire it up again and log into Google and set up your account again the apps will all "come back" to you....you will see them installing one by one as you are connected to the net....
Pretty cool huh? Gotta love Google and its cloud recovery options.........it's where all is going these days.
Chrome Remote Desktop Beta.....check this out!
Nice feature...remote desktop right from your browser to a MAC, Linux or Windows machine....works great with all....
Just install the extension from the Chrome Apps store and give it a try.....more to come from Google!
Just install the extension from the Chrome Apps store and give it a try.....more to come from Google!
"Chrome Remote Desktop BETA is the first installment on a capability allowing users to remotely access another computer through the Chrome browser or a Chromebook.

The goal of this beta release is to demonstrate the core Chrome Remoting technology and get feedback from users. This version enables users to share with or get access to another computer by providing a one-time authentication code. Access is given only to the specific person the user identifies for one time only, and the sharing session is fully secured. One potential use of this version is the remote IT helpdesk case. The helpdesk can use the Chrome Remote Desktop BETA to help another user, while conversely a user can receive help by setting up a sharing session without leaving their desk. Additional use cases such as being able to access your own computer remotely are coming soon.

Chrome Remote Desktop BETA is fully cross-platform, so you can connect any two computers that have a Chrome browser, including Windows, Linux, Mac and Chromebooks."
LINK
Saturday, October 8, 2011
Geek Mode.....one secret of Windows 7 revealed
Windows has a hidden “How-To Geek Mode” that you can enable which gives you access to every Control Panel tool on a single page—and we’ve documented the secret method for you here.
Update: Do not use this on Vista. If you did, you can use Ctrl+Shift+Esc to start task manager, File \ Run and open a command prompt with cmd.exe, and then use the rmdir command to get rid of the folder.
To activate the secret How-To Geek mode, right-click on the desktop, choose New –> Folder, and then give it this name:

Once you’ve done so, you’ll have activated the secret mode, and the icon will change…

Double-click on the icon, and now you can use the How-To Geek mode, which lists out every single Control Panel tool on a single page.

At this point you might notice why this is a stupid geek trick—it’s much easier to use the default Control Panel than navigating through a massive list, and anybody that really calls themselves a geek will be using the Start Menu or Control Panel search box anyway.
In case you were wondering, this is the same as that silly “God Mode” trick that everybody else is writing about. For more on why it’s pointless, see Ed Bott’s post on the subject.
Alright, So It’s Not Really a Secret How-To Geek Mode
Sadly, this is nothing more than a stupid geek trick using a technique that isn’t widely known—Windows uses GUIDs (Globally Unique Identifiers) behind the scenes for every single object, component, etc. And when you create a new folder with an extension that is a GUID recognized by Windows, it’s going to launch whatever is listed in the registry for that GUID.
You can see for yourself by heading into regedit.exe and searching for {ED7BA470-8E54-465E-825C-99712043E01C} under the HKCR \ CLSID section. You’ll see on the right-hand pane that it’s the “All Tasks” view of the Control Panel, which you can’t normally see from the UI.

You can use this same technique for other Windows objects by doing some digging around in the registry… for instance, if you were to search under HKCR \ CLSID for “Recycle Bin”, you’d eventually come across the right key—the one on the left-hand side here:

So if you created a folder with the name “The Geek Knows Deleted Files.{645FF040-5081-101B-9F08-00AA002F954E}”, you’d end up with this icon, clearly from the Recycle Bin.

And it’s even a fully functional Recycle Bin… just right-click and you’ll see the menu:

So here’s the quick list of the ones I felt like digging up, but I’m sure there’s more things you can launch if you really felt like it.
Create Shortcuts to GUIDs
Since the GUID points to a Windows object launched by Windows Explorer, you can also create shortcuts and launch them directly from explorer.exe instead of creating the folder. For instance, if you wanted to create a shortcut to My Computer, you could paste in the following as the location for a new shortcut:

And just like that, you’d have a shortcut to My Computer, which you can customize with a different icon, and a shortcut key if you so choose.

Yeah, it’s a stupid geek trick, but it’s always fun to learn new things.
Note: The Control Panel’s All Items hack and the Libraries hack will probably only work in Windows 7. The others should work in any version of Windows.
(COURTESY OF HOW TO GEEK)
Update: Do not use this on Vista. If you did, you can use Ctrl+Shift+Esc to start task manager, File \ Run and open a command prompt with cmd.exe, and then use the rmdir command to get rid of the folder.
To activate the secret How-To Geek mode, right-click on the desktop, choose New –> Folder, and then give it this name:
How-To Geek.{ED7BA470-8E54-465E-825C-99712043E01C}
Once you’ve done so, you’ll have activated the secret mode, and the icon will change…
Double-click on the icon, and now you can use the How-To Geek mode, which lists out every single Control Panel tool on a single page.
At this point you might notice why this is a stupid geek trick—it’s much easier to use the default Control Panel than navigating through a massive list, and anybody that really calls themselves a geek will be using the Start Menu or Control Panel search box anyway.
In case you were wondering, this is the same as that silly “God Mode” trick that everybody else is writing about. For more on why it’s pointless, see Ed Bott’s post on the subject.
Alright, So It’s Not Really a Secret How-To Geek Mode
Sadly, this is nothing more than a stupid geek trick using a technique that isn’t widely known—Windows uses GUIDs (Globally Unique Identifiers) behind the scenes for every single object, component, etc. And when you create a new folder with an extension that is a GUID recognized by Windows, it’s going to launch whatever is listed in the registry for that GUID.
You can see for yourself by heading into regedit.exe and searching for {ED7BA470-8E54-465E-825C-99712043E01C} under the HKCR \ CLSID section. You’ll see on the right-hand pane that it’s the “All Tasks” view of the Control Panel, which you can’t normally see from the UI.
You can use this same technique for other Windows objects by doing some digging around in the registry… for instance, if you were to search under HKCR \ CLSID for “Recycle Bin”, you’d eventually come across the right key—the one on the left-hand side here:
So if you created a folder with the name “The Geek Knows Deleted Files.{645FF040-5081-101B-9F08-00AA002F954E}”, you’d end up with this icon, clearly from the Recycle Bin.
And it’s even a fully functional Recycle Bin… just right-click and you’ll see the menu:
So here’s the quick list of the ones I felt like digging up, but I’m sure there’s more things you can launch if you really felt like it.
Recycle Bin: {645FF040-5081-101B-9F08-00AA002F954E}To use any of them, simply create a new folder with the syntax AnyTextHere.{GUID}
My Computer: {20D04FE0-3AEA-1069-A2D8-08002B30309D}
Network Connections: {7007ACC7-3202-11D1-AAD2-00805FC1270E}
User Accounts: {60632754-c523-4b62-b45c-4172da012619}
Libraries: {031E4825-7B94-4dc3-B131-E946B44C8DD5}
Create Shortcuts to GUIDs
Since the GUID points to a Windows object launched by Windows Explorer, you can also create shortcuts and launch them directly from explorer.exe instead of creating the folder. For instance, if you wanted to create a shortcut to My Computer, you could paste in the following as the location for a new shortcut:
explorer ::{20D04FE0-3AEA-1069-A2D8-08002B30309D}
And just like that, you’d have a shortcut to My Computer, which you can customize with a different icon, and a shortcut key if you so choose.
Yeah, it’s a stupid geek trick, but it’s always fun to learn new things.
Note: The Control Panel’s All Items hack and the Libraries hack will probably only work in Windows 7. The others should work in any version of Windows.
(COURTESY OF HOW TO GEEK)
Thursday, October 6, 2011
Remembering when it all started...Steve Jobs introduces the Macintosh
"I’m convinced that the only thing that kept me going was that I loved what I did. You’ve got to find what you love. And that is as true for your work as it is for your lovers. Your work is going to fill a large part of your life, and the only way to be truly satisfied is to do what you believe is great work. And the only way to do great work is to love what you do. If you haven’t found it yet, keep looking. Don’t settle."
From the Stanford University Address in 2005
A man who, in his own words, "put a dent in the universe."
Wednesday, October 5, 2011
Opera 11.51---faster than the fastest right now!
So go give it a try and see what you think.... OPERA 11.51
How to import Firefox bookmarks into it if you decide to keep it...
How to import Firefox bookmarks into it if you decide to keep it...
Exporting bookmarks from Firefox
- Click the Bookmarks button
 on the right side of the navigation toolbar (Windows XP: click the menu) and select to open the Library window.
 - From the toolbar on the Library window, select and choose .

- In the Export Bookmarks File window that opens, choose a location to save the file, which is named bookmarks.html by default. The desktop is usually a good spot, but any place that is easy to remember will work.
- Save the bookmarks HTML file. The Export Bookmarks File window will close and you can close the Library window.
Importing bookmarks into Opera
- Start Opera.
- Click on the button, select the menu and then select . The Bookmarks tab will open.
- In the Bookmarks tab, click and select .

- Locate the bookmarks.html file you previously created and then click the button. A box will come up informing you that your bookmarks have been imported.
- Click on the button.
Saturday, October 1, 2011

Subscribe to:
Posts (Atom)
Using the Brave Browser How to's
when you install the Brave browser you will notice the toolbar on the top is small and also the tabs are small.....no one seems to have the ...
-
By default the Windows 7 Starter and Windows 7 Home Basic editions do not include the Personalization features such as change desktop backgr...
-
Open your Chrome Browser....Ctrl T....viola all of them appear....happy Apping!
