On the Pi you should always disable "Extract thumbnail and video information"
Settings>
Video>
File lists>
untick "Extract thumbnails and video information"
http://wiki.xbmc.org/index.php?title=Settings/Videos"
you won't have the reboot problems anymore...
Thursday, November 14, 2013

Tuesday, November 12, 2013
Server for XBMC issues
Ok:
Here's the scoop at this time
XBMC Hub is here:
http://fusion.xbmchub.com
XUNITY is here:
http://xfinity.xunitytalk.com
another server with XUNITY is here
but is basic plugin
http://easy.xbmctalk.us
The setup is through "file manager" in System
Here's the scoop at this time
XBMC Hub is here:
http://fusion.xbmchub.com
XUNITY is here:
http://xfinity.xunitytalk.com
another server with XUNITY is here
but is basic plugin
http://easy.xbmctalk.us
The setup is through "file manager" in System
Thursday, October 31, 2013
XBMC Thumbnail issue and fix
HAVING ISSUES WITH THUMBNAILS NOT DISPLAYING CORRECTLY? IT’S EASY TO FIX!
Step 1: Navigate to the “File manager” tab under the “SYSTEM” heading within XBMC.

Step 2: Open the “Profile Directory” on the left side of the screen.

Step 3: Open the “Database” folder on the left side of the screen.

Step 4: Highlight the “Textures13.db” or whichever “Textures##.db” has the highest number.

Step 5: Toggle the Context
Menu within XBMC (either by right clicking on your mouse, clicking with
two finders on a tablet, holding the “MENU” button on your Apple TV
remote) and then click on the “Delete” buttton.

Step 6: Press “Yes” to confirm that you wish to delete the folder when prompted.

Step 7: Reboot your device once complete, that’s it!
Courtesy HTG
PS...for some this did not work...if not try another users method:
PS...for some this did not work...if not try another users method:
Sunday, October 6, 2013
Fresh Start- Give XBMC a clean-up..Here's how........

Step 14: Click on the “plugin.video.freshstart-1.0.0.zip” to install the necessary addon.

Step 15: Return to the main menu, and navigate to the “Add-ons” tab under the “VIDEOS” menu heading.

Step 16: Click on the addon called “XBMC Fresh Start” to get it done.

Step 17: When prompted, press the “Yes” button to confirm the process.

Step 18: It’ll only take a moment and you’ll see the word “Done” displayed within the window once completed.

Step 19: Return to the main menu and reboot your device in order for the changes to take place.

Step 20: Relaunch XBMC and take a breath of fresh air in your clean installation of XBMC that’s as good as new.

Step 21: Start
using XBMC as if it was your first time ever. You’ll probably now want
to go ahead and automatically configure it in less than two minutes with
our XBMC HUB Wizard Addon tool which will preconfigure it with all the best goodies you want on your XBMC setup. The possibilities are endless!
Congratulations! You’ve
now been introduced to the Doomsday Tool of XBMC addons. It’s definitely
something very powerful that should be used with caution, although
sometimes it could be just what your XBMC needs prior to
reconfiguration, that way you won’t have any of the clutter in your way.
If you enjoyed this addon, please help us spread the word so that
others can enjoy it too! As usual, if you have any questions or
comments, feel free to visit our Discussion Forums anytime you’d like.
Courtesy xbmchub.com
Friday, October 4, 2013
Microsoft Security Essentials is no longer good for antivirus...here's another option.....
Here's the best option on my recommendation at this time for 2013:

Antivirus Free Edition
A free antivirus that uses #1 ranked technology and is feather-light.
FREE DOWNLOAD
They only ask that you create a login and it is spyware free (obviously) and then it runs virtually unknown to you and keeps you safe!
XBMC Imposters....beware of spam coming into XBMC software!
There have been some imposter XBMC HUB sites that have been opening
lately which put your privacy and security at risk. Please beware of
imposters and remember that XBMCHUB.COM is the only site you should
trust for all your third party addon needs!
My Advice: Go into Fusion Server via "Install from a zip file" and run the newest Hub Wizard....you may want to uninstall XBMC first and do a fresh install and then run the Wizard....to be safe....it reinstalls all the plug ins that are safe to run and they work great!
It will overwrite all the code if you run it without re-installing but some fragments remain....
these imposters are installing things without your knowing it and some are getting pop-ups etc...
Please be safe in the web world!
My Advice: Go into Fusion Server via "Install from a zip file" and run the newest Hub Wizard....you may want to uninstall XBMC first and do a fresh install and then run the Wizard....to be safe....it reinstalls all the plug ins that are safe to run and they work great!
It will overwrite all the code if you run it without re-installing but some fragments remain....
these imposters are installing things without your knowing it and some are getting pop-ups etc...
Please be safe in the web world!
Sunday, September 22, 2013
Keep Your System Drivers Up To Date With This Free Software!
DRIVER BOOSTER LINK
Keeping drivers up to date is a chore for most of the users.
This activity is rarely carried out by beginner and average users; even
more experienced ones, though aware of the benefits of this procedure,
forget about installing the latest revisions.
The performance of the entire system can be noticeably improved by adding the latest drivers to the system.
Driver Booster from IObit has been designed as a simple solution for detecting outdated drivers, downloading and installing them. Everything works automatically and the user has to click only a few times in order to complete the operation.
The application is available free of charge, but a paid variant ($28.95 / 22 EUR), called Pro, also exists. Users of the latter are treated with priority and should receive the files faster.
Installing Driver Booster is straightforward as the product does not require additional resources for proper functioning and no third-party software is pushed onto the system in the process.
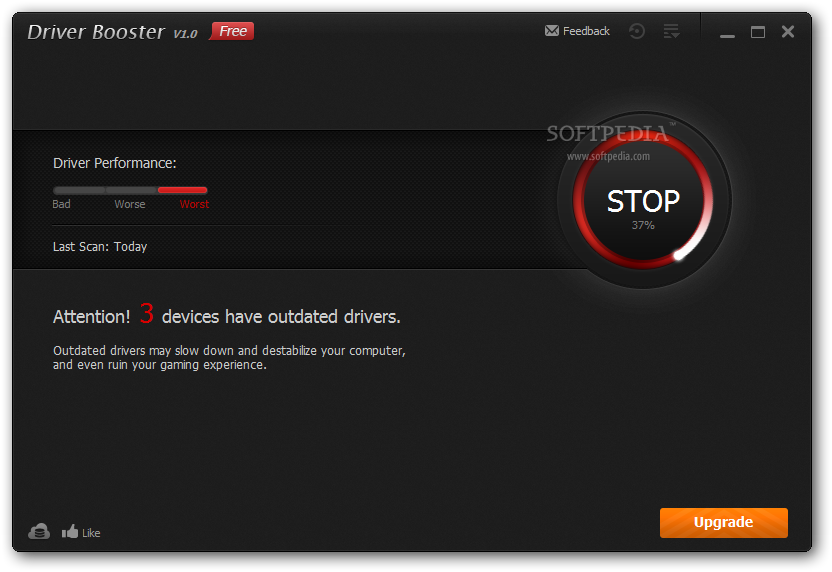
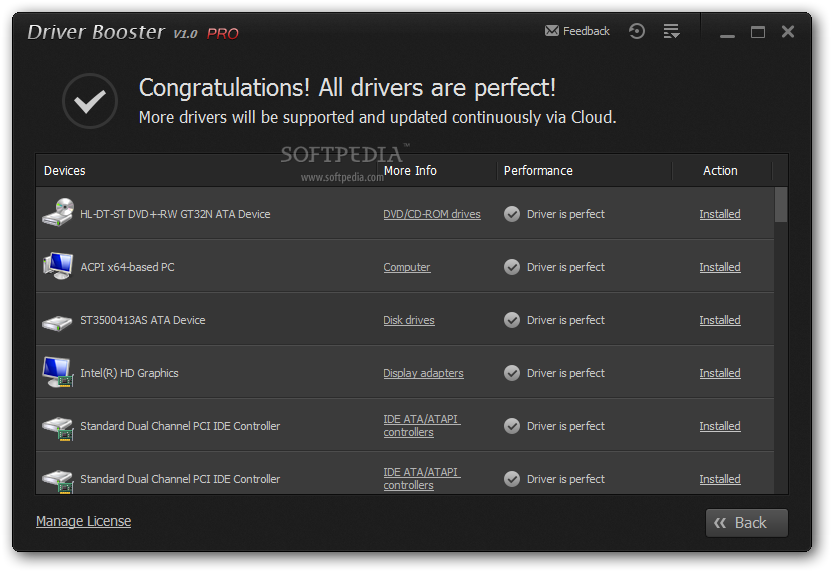
Looks are pretty simple, with the main screen displaying in a clear manner whether there are outdated drivers present on the system or not. In case of the former scenario a large “scan” button can initiate the detection procedure.
Also available in the main application window is an assessment of the driver performance, which, as far as we could tell, relies on the version of the installed driver: the older it is, the worse the performance.
During our tests, the detection process took under 15 seconds to complete, even on an older test machine.
With a database currently holding 35,862 devices, it is quite difficult for Driver Booster to lack the necessary details about a hardware component.
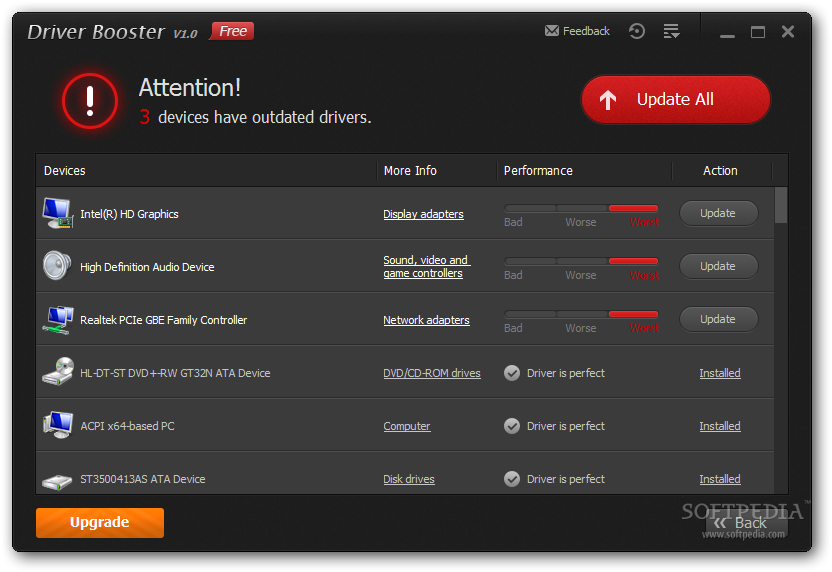
When the scan finishes, you are displayed the drivers that have a newer version available for download. One click on the “Update All” button starts the process of downloading and installing the necessary files.
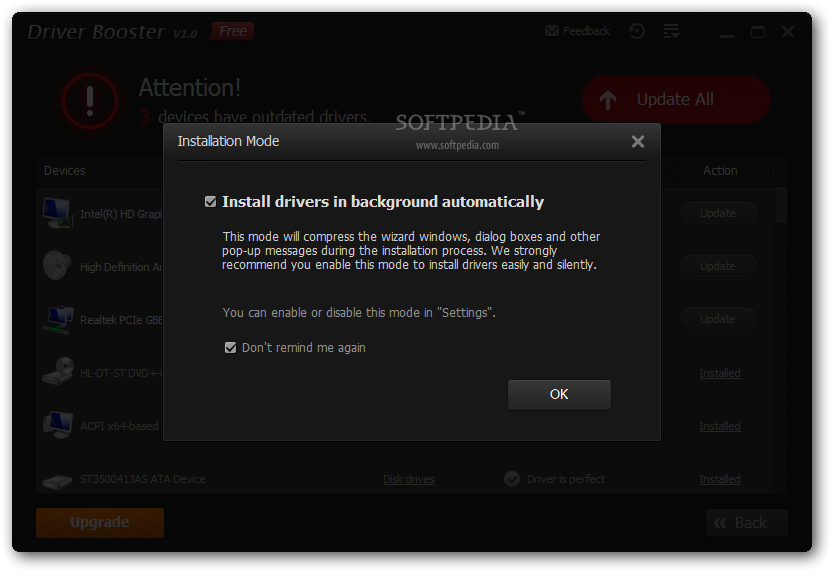
By default, everything is carried out automatically in the background so you do not have to go through additional wizard windows or dialog boxes. This can be disabled in the configuration panel of the program, though.
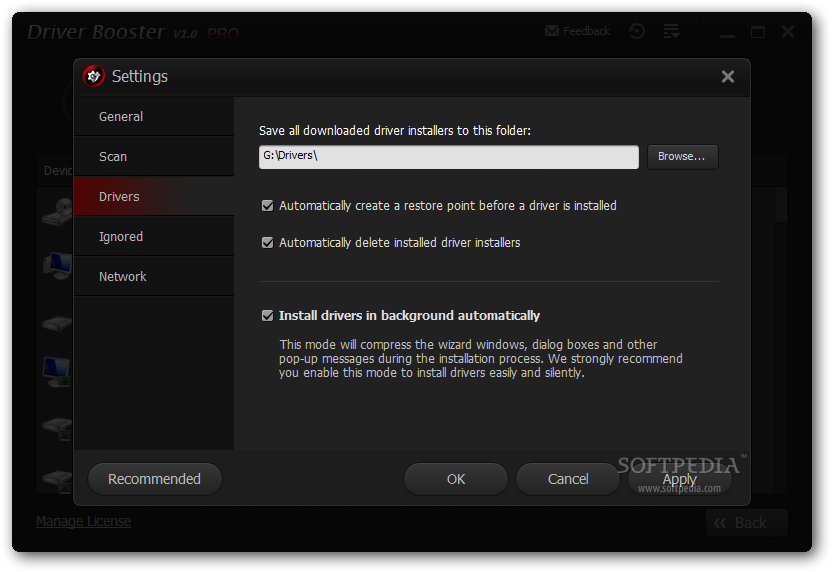
For safety reasons, a restore point is created before replacing anything on the system; thus you can return to the previous configuration should something go wrong. Some drivers require restarting the system for all the changes to take effect.
IObit’s product can offer details about the currently installed version of the file and the newer one available for download, as well as the size of the update and its release date.
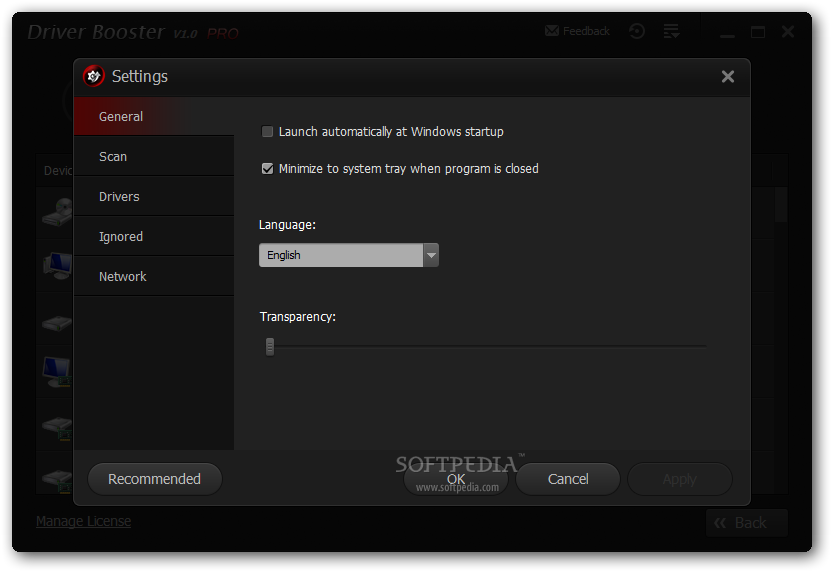
The configuration panel features options for tweaking the application to work the way you want. You can set it to start with the operating system and perform a scan immediately or it can search for outdated drivers at user-defined time intervals: twice a week, every day or on a monthly basis.
Since it downloads the files locally, it offers the possibility to define a specific location to store all the files. Some of the data may be quite large so in order to preserve disk space, it can delete all the files automatically after installing them.
The “Settings” panel is also the place where you can disable the creation of a restore point, although we strongly recommend against it.
While the drivers are installing, you may experience some strange behavior, such as flickering of the display or the monitor turning black altogether for a few seconds.
Additionally, we noticed that at times that some peripherals would temporarily fail to respond. This is normal behavior and as soon as the new files are on the system, everything will work just fine.
Generally updating drivers is not an activity that can be carried out too often, but having Driver Booster check for new releases automatically not only is one chore less, but it also ensures that the system benefits from the latest developments that more often than not results in better hardware performance.
The Good
Outdated drivers are listed first. There is little to configure as the default setup is suitable for most users.
Before installing anything on the computer, it creates a system restore point and each of them can be managed from inside the application.
Scans can be scheduled to run with specific frequency.
The Bad
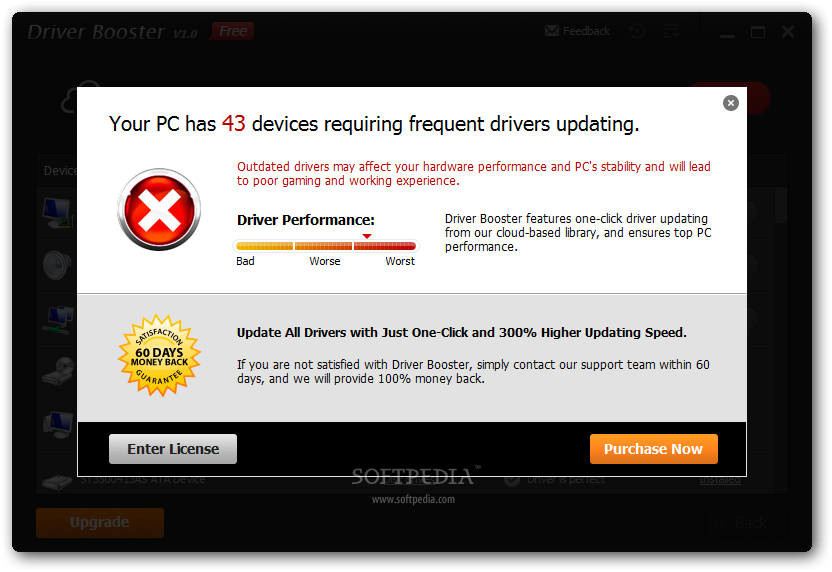
When trying to upgrade, the application informs of a number of drivers that require frequent updates (in our case the alert was for 43 of them on one test system and about 90 on the other), only as an incentive for placing the order. In our few days’ testing, no drivers required an update except for the initial ones.
The Truth
By far, one of the greatest features, besides the ability to download and install drivers in the background, is creating restore points that can be accessed from the System Restore applet in Windows.
Driver Booster worked fine during our tests and the problems created by incompatible drivers were eliminated by reverting the system to a previous state.

|
The performance of the entire system can be noticeably improved by adding the latest drivers to the system.
Driver Booster from IObit has been designed as a simple solution for detecting outdated drivers, downloading and installing them. Everything works automatically and the user has to click only a few times in order to complete the operation.
The application is available free of charge, but a paid variant ($28.95 / 22 EUR), called Pro, also exists. Users of the latter are treated with priority and should receive the files faster.
Installing Driver Booster is straightforward as the product does not require additional resources for proper functioning and no third-party software is pushed onto the system in the process.
Looks are pretty simple, with the main screen displaying in a clear manner whether there are outdated drivers present on the system or not. In case of the former scenario a large “scan” button can initiate the detection procedure.
Also available in the main application window is an assessment of the driver performance, which, as far as we could tell, relies on the version of the installed driver: the older it is, the worse the performance.
During our tests, the detection process took under 15 seconds to complete, even on an older test machine.
With a database currently holding 35,862 devices, it is quite difficult for Driver Booster to lack the necessary details about a hardware component.
When the scan finishes, you are displayed the drivers that have a newer version available for download. One click on the “Update All” button starts the process of downloading and installing the necessary files.
By default, everything is carried out automatically in the background so you do not have to go through additional wizard windows or dialog boxes. This can be disabled in the configuration panel of the program, though.
 |  |  |  |  |
For safety reasons, a restore point is created before replacing anything on the system; thus you can return to the previous configuration should something go wrong. Some drivers require restarting the system for all the changes to take effect.
IObit’s product can offer details about the currently installed version of the file and the newer one available for download, as well as the size of the update and its release date.
The configuration panel features options for tweaking the application to work the way you want. You can set it to start with the operating system and perform a scan immediately or it can search for outdated drivers at user-defined time intervals: twice a week, every day or on a monthly basis.
Since it downloads the files locally, it offers the possibility to define a specific location to store all the files. Some of the data may be quite large so in order to preserve disk space, it can delete all the files automatically after installing them.
The “Settings” panel is also the place where you can disable the creation of a restore point, although we strongly recommend against it.
While the drivers are installing, you may experience some strange behavior, such as flickering of the display or the monitor turning black altogether for a few seconds.
Additionally, we noticed that at times that some peripherals would temporarily fail to respond. This is normal behavior and as soon as the new files are on the system, everything will work just fine.
Generally updating drivers is not an activity that can be carried out too often, but having Driver Booster check for new releases automatically not only is one chore less, but it also ensures that the system benefits from the latest developments that more often than not results in better hardware performance.
 |  |  |  |  |
The Good
Outdated drivers are listed first. There is little to configure as the default setup is suitable for most users.
Before installing anything on the computer, it creates a system restore point and each of them can be managed from inside the application.
Scans can be scheduled to run with specific frequency.
The Bad
When trying to upgrade, the application informs of a number of drivers that require frequent updates (in our case the alert was for 43 of them on one test system and about 90 on the other), only as an incentive for placing the order. In our few days’ testing, no drivers required an update except for the initial ones.
The Truth
By far, one of the greatest features, besides the ability to download and install drivers in the background, is creating restore points that can be accessed from the System Restore applet in Windows.
Driver Booster worked fine during our tests and the problems created by incompatible drivers were eliminated by reverting the system to a previous state.
Friday, September 20, 2013
10 more GB from Google.....here's how and do it now before the offer expires!

Google is adding 10GB of free storage to your Google Drive account when you log into your Google account with the new Google Quickoffice before September 26, 2013. The official statement can be found here.
Here's our you can get your free 10GB storage:
- Get the Google Quickoffice app from the app store.
- Run the app after installing it.
- Log into your Google Account and you'll get the 10GB extra storage.
- You can log into your other Google accounts by tapping on the profile picture and then "Change Account" and log into the other accounts one by one.
Nevertheless, it doesn't hurt to try. Do it soon if you don't want to miss out on 10GB of extra storage in your Google Drive account.
Saturday, September 14, 2013
Wisestamp for Safari Browser
If you are having difficulty with the Wisestamp plugin for MAC here is the page for you and
the followup will happen once you install the plugin...
GET IT HERE
the followup will happen once you install the plugin...
GET IT HERE
Thursday, September 5, 2013
Get back to Classic Gmail InBox
![no-email-inbox-gimmicks[4]](https://lh3.googleusercontent.com/blogger_img_proxy/AEn0k_vDytdgRthm2vCixsVPR-rSq95D5mjJFP_b_hwceON0qAJwwBGcbpbf9w1pKqLeHv9kIhf9QtSEP1yCb5Vju7CXDJRiIpnogRkK02-kBXU782viYQHcqWm2HNjKY2v9uoyILyv2yDodY1V5wwWvu7v8WAZg=s0-d "no-email-inbox-gimmicks[4]")
Email inbox gimmicks keep popping up. First Google introduced Priority Inbox, and now it’s using category tabs. Dropbox purchased Mailbox, which turns your inbox into more of a to-do-list. Microsoft’s Outlook.com has a Sweep feature that automatically cleans your inbox.
All of these are attempts to manage your email inbox for you. These gimmicks are never as smart as you yourself are, so you can make your email much smarter by taking a more active role.
We’ll be using Gmail here, but the principles should be similar for any email client.
Use a Classic Inbox
First, we’ll get rid of whatever gimmicky inbox Gmail is using today. These inboxes never get the categories and prioritization perfectly right. They force you to go through all your email to ensure you don’t miss anything and encourage you to keep getting spammy useless emails by sweeping them under the rug.To use a more classic inbox in Gmail, click the gear icon and select Settings. Click over to the Inbox tab, click the Inbox type box, and select Unread first. All the tabs and priority options will vanish.
 Courtesty HTG
Monday, August 19, 2013
Team Viewer-what is it and why you should be using it
TeamViewer
TeamViewer is the remote support tool of choice for many geeks. It can be used in several different ways. You can direct your partner to download the TeamViewer QuickSupport application, which can run without administrator access or any system configuration. It will give them a session ID and password that they can give to you, allowing you to easily remotely connect from your TeamViewer program. There’s no setup process here — just download the appropriate program and double-click it to launch it.
You could also opt to set up unattended access after installing the full TeamViewer client, giving you permanent remote access to the computer without the remote user having to give you any passwords or confirm anything. As long as their computer is on, you’ll be able to access it remotely. If you want to do preventative maintenance or fix their computer while they’re not around, this is a convenient option.

TeamViewer is also cross-platform, so you can use it to troubleshoot a Mac or troubleshoot your parents’ Windows computer from your Linux PC. You can even remotely connect from an Android or iOS device. We’ve taken an in-depth look at TeamViewer in the past.
Courtesty HTG
Subscribe to:
Posts (Atom)
Once I did this it worked